Showing posts with label destinee. Show all posts

Saturday, January 12, 2013

Operation Organization ~ Linen Closet

Let me just start out by saying that this photo is embarrassing...


I always felt like I had my linen closet under control... but then I took a closer look and realized I must need glasses. I was in denial. Soooo after being in denial for longer than I would like to admit, I decided to take action and start the process of organizing my home again. Party Time.
 
 
I Started by taking EVERYTHING out of the linen closet... I had NO idea that I owned 974 blankets! How a 23 year-old accumulated so many blankets is beyond my understanding.
 
I started by measuring my space to see what type of organization I could fit. I found the large green stacking crates at the Dollar General for $5 dollars each, the smaller crates(on the left)I already owned (dollar tree), and the chalk board stickers were left-over from another project (amazon).


After taking all 974 blankets out of my linen closet I decided to tackle the medicine drawers. I have always organized our medicine in drawers so I just needed to clean them. To my surprise about half of our vitamins and medicines were well past expired =(


I separate our medicines into two categories: P.O., which means anything by mouth, and Topical- anything first aid related, etc. This is just what works for us and makes it easier to find what we need quickly. Finding what works best for you and your family is the key to not only GETTING organized, but STAYING organized.
 
*******
 
This is how the top shelves looked "After".


Top Shelf: The pouch to the left (in the photo) is full of our traveling toiletries, on the right of the "Topical Meds" drawer is my heating pad.
The Second shelf houses (from left to right): The Boys' Hair Clippers, P.O. Meds, spare tooth brushes, and the drawer organizer on the side is filled with travel tissues and hand sanitizers.
Third Shelf: Rubbing Alcohol, four small baskets with the following contents: Emmett's first aid, Emmett's medications, pillow cases, and sheets.
 
 
These bottom shelves are a bit more simple: towels and blankets. We keep the majority of our towels in the hall bathroom, this is just for the over-flow.


***The full view of the AFTER ***


I know it is an awkward angle, but the linen closet is in our hallway.
I was not able to fit all of our blankets back into the closet; however, as a family of three there is really no need for 974 blankets. I kept the ones I really liked and the ones I have used since I was Emmett's age... The rest I donated to my Mom, who conveniently enough, doesn't have 974 blankets.
 
Total Cost: $15

Thursday, January 3, 2013

*Thrifty Thursday*


I have an unnatural aversion to light-colored wood.... everything in my childhood home was either pine or maple. So after years of staring at a maple knife block, it was time to party.

That you'll need:
~ An ugly knife block
~ Acrylic Paint and Paint brush
~ 3D Paint
~ Pencil or Pen
~ You can either free-hand a design or print one from the computer.

First, you want to make sure the knife block is completely clean. Since its home is near the stove, I used a spray cleaner to make sure it was not only free of dust, but grease as well.


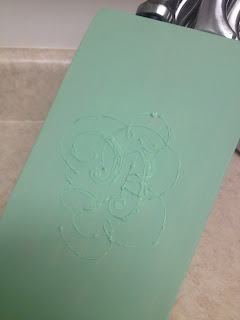
After cleaning your knife block and assembling your supplies, draw your design or use a pencil or pen to trace your design- make sure to press hard to leave an indention in the wood to help guide your paint. I used a white 3D paint.

 
I chose a "B" monogram for our last name.


After this step is it very important that you let the paint dry completely. Then, use a paint brush to paint the entire knife block the color of your choice... I chose my favorite, green =)


*The Finished Product*


"Ta-Da"!!! I absolutely love the finished product, it is subtle and adds color. A few other ideas include: adding the puffy paint last so it contrasts with your base color, using a decal instead of puffy paint, using decoupage or adding pattern. You may also chose to add a clear coat; however, it is not necessary. I hope you leave this post inspired to spice up your boring knife block =)

Saturday, December 29, 2012

Freezer Meals~ How to

All Moms are busy: working, stay at home, or anywhere in between I think we all sometimes struggle to get a home-made dinner on the table. After eating out twice last week for dinner, I decided I needed to replenish my freezer and crock pot meals. I started yesterday getting some freezer meals set aside. I made a HUGE batch of meat sauce and a pot of Chili. I set a bowl of each aside for my Hubby and froze the rest. It is also helpful to make double-batches of the meals you are already making for dinner so you don't have to spend all day cooking.

*What You Need*

  • good-quality freezer bags
  • measuring cup, a sharpie (not a fine-tip as it may puncture the bag... found that out the hard way)
  • baking sheet to stack the bags flat for freezing
  • and of course food =)
 Once you are ready to use the meal you may choose to either thaw overnight in the fridge or place in the sink under cold running water. Heat in a pot (or microwave) and enjoy. =)

Meat Sauce =)


Chili


Make sure to label each bag with what is inside and the date. Once frozen, everything starts to look the same. If you are prepping food for the crock-pot it is helpful to add any instructions and cook time.


Since I use Meat sauce in many recipes, I decided to measure the amount placed in each bag.


I found is is better to use a measuring cup to fill the bags, because it makes much less mess than a ladle.


Lay flat and place in freezer or deep-freeze... I left it over-night.


This is how thin my Chili froze. It's a full meal and barely uses any space =)


Front view of frozen Chili =)

Tuesday, September 20, 2011

The most AMAZING French Toast EVER!!!

This recipe is a twist on the traditional french toast-it's Baked! This is a great recipe for special occasions, company, or just a delicious Saturday morning treat.

Baked French Toast

Ingredients:
1 - stick of butter
1 - tsp of corn syrup
1 - cup of brown sugar
Loaf of french bread- sliced about 3/4 in think (the amount of bread is up to you)
5 - eggs
1 - tsp cinnamon
1 1/2 - cups of milk
1/2 - tsp of vanilla extract

Combine butter, corn syrup, and brown sugar in a small sauce pan and bring to a boil for about 1 minute. Then using a 9X13 baking dish spread the mixture at the bottom of the pan. Next, add the french bread in a single layer. Then, combine eggs, cinnamon, milk, and vanilla in a bowl and beat together. Pour over the bread and cover the pan in foil. You can then either refrigerate overnight or let sit in the fridge until the eggs mixture is soaked into the bread.
Place the uncovered pan in the oven, pre-heated to 350*F and bake for 40 minutes. ENJOY!