Showing posts with label home. Show all posts

Saturday, January 12, 2013

Operation Organization ~ Linen Closet

Let me just start out by saying that this photo is embarrassing...


I always felt like I had my linen closet under control... but then I took a closer look and realized I must need glasses. I was in denial. Soooo after being in denial for longer than I would like to admit, I decided to take action and start the process of organizing my home again. Party Time.
 
 
I Started by taking EVERYTHING out of the linen closet... I had NO idea that I owned 974 blankets! How a 23 year-old accumulated so many blankets is beyond my understanding.
 
I started by measuring my space to see what type of organization I could fit. I found the large green stacking crates at the Dollar General for $5 dollars each, the smaller crates(on the left)I already owned (dollar tree), and the chalk board stickers were left-over from another project (amazon).


After taking all 974 blankets out of my linen closet I decided to tackle the medicine drawers. I have always organized our medicine in drawers so I just needed to clean them. To my surprise about half of our vitamins and medicines were well past expired =(


I separate our medicines into two categories: P.O., which means anything by mouth, and Topical- anything first aid related, etc. This is just what works for us and makes it easier to find what we need quickly. Finding what works best for you and your family is the key to not only GETTING organized, but STAYING organized.
 
*******
 
This is how the top shelves looked "After".


Top Shelf: The pouch to the left (in the photo) is full of our traveling toiletries, on the right of the "Topical Meds" drawer is my heating pad.
The Second shelf houses (from left to right): The Boys' Hair Clippers, P.O. Meds, spare tooth brushes, and the drawer organizer on the side is filled with travel tissues and hand sanitizers.
Third Shelf: Rubbing Alcohol, four small baskets with the following contents: Emmett's first aid, Emmett's medications, pillow cases, and sheets.
 
 
These bottom shelves are a bit more simple: towels and blankets. We keep the majority of our towels in the hall bathroom, this is just for the over-flow.


***The full view of the AFTER ***


I know it is an awkward angle, but the linen closet is in our hallway.
I was not able to fit all of our blankets back into the closet; however, as a family of three there is really no need for 974 blankets. I kept the ones I really liked and the ones I have used since I was Emmett's age... The rest I donated to my Mom, who conveniently enough, doesn't have 974 blankets.
 
Total Cost: $15

Thursday, January 3, 2013

*Thrifty Thursday*


I have an unnatural aversion to light-colored wood.... everything in my childhood home was either pine or maple. So after years of staring at a maple knife block, it was time to party.

That you'll need:
~ An ugly knife block
~ Acrylic Paint and Paint brush
~ 3D Paint
~ Pencil or Pen
~ You can either free-hand a design or print one from the computer.

First, you want to make sure the knife block is completely clean. Since its home is near the stove, I used a spray cleaner to make sure it was not only free of dust, but grease as well.


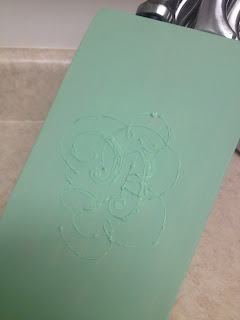
After cleaning your knife block and assembling your supplies, draw your design or use a pencil or pen to trace your design- make sure to press hard to leave an indention in the wood to help guide your paint. I used a white 3D paint.

 
I chose a "B" monogram for our last name.


After this step is it very important that you let the paint dry completely. Then, use a paint brush to paint the entire knife block the color of your choice... I chose my favorite, green =)


*The Finished Product*


"Ta-Da"!!! I absolutely love the finished product, it is subtle and adds color. A few other ideas include: adding the puffy paint last so it contrasts with your base color, using a decal instead of puffy paint, using decoupage or adding pattern. You may also chose to add a clear coat; however, it is not necessary. I hope you leave this post inspired to spice up your boring knife block =)

Monday, December 31, 2012

*Make-Up Monday*

This Monday is all about make-up storage and my new acrylic drawers. I wanted something that looked nicer than just your typical plastic drawer, without breaking the bank. If you have looked into acrylic storage items you know they can be pricey, so I was thrilled when I bought these from amazon (where I buy everything) for only $12!!! I am in love with how great these look and I love how much storage they offer and I still have plenty of empty space... for now anyway ;)


I keep the drawers on a storage cabinet in my bathroom =)


Has room for all my current palettes with room to grow! =)
 
Buy these drawers =)

Monday, December 3, 2012

Emmett's Nursery

I was looking through some pictures the other day and found pictures of Emmett's Nursery! I was so proud of the way it turned out and I have to share!

Below is a picture of his crib: It's a Graco convertable crib (lauren in espresso), we got it from
Toys R Us. His bedding is "Jungle friends" from target, and the mobile and other crib toy was bought second-hand. 
Note: Under the crib I added sterilite drawer I bought from Target, I keep clothes he has yet to grow into. They are the perfect storage solution!

What I may be MOST proud of is his changing table/dresser. My little brother gave this to us and it had seen better days... and was white. I sanded it lightly and painted it using BEHR interior satin paint in Blue Chaise. I couldn't be happier!
I organized his drawers according to style of clothing (onsie, pj's etc), and kept extra supplies in the cabinet.

Below is the wall where is changing table is located.

The cart is from Munchkin (target) and the wall decals are from Hobby Lobby.

Here is the view of the wall his crib is on. I hung his comforter on the wall using two screws and two binder clips- I figured he wouldn't be using it for a while. The white wall shelves are from, you guessed it, Target and the "Emmett" letters were bought white at Michael's and a friend and  I spent hours painting them to match his "Jungle Friends" bedding. LOVE!


I don't think I could have been anymore in love with his nursery.

Wednesday, November 28, 2012

Turkey Noodle Soup

Growing up, I always dreaded the week after Thanksgiving... Why? We would eat nothing but ham or turkey sandwiches... no thanks. I became determined to make something out of the left-overs- something more than a sandwich. Since necessity is the mother of invention, I  invented some Turkey Noodle Soup.

The great thing about this recipe is that it is extremely adaptable.. you can use whatever you happen to have in your kitchen.


Here's What you do:
~In a large stock pot place your turkey carcass (hate that word) in plenty of water- cover and boil. I also add plenty of garlic powder, onion powder, and pepper (add to taste). This takes time, how much time depends on how large your turkey was and how much water. You will know when it is done when your water starts to look like broth and smell amazing... Mine took about an hour. The next step is VERY important: Make sure you double strain your stock- you don't want anything crazy in your broth.
~Next, place the strained broth back into your stock pot (I rinse mine out to save dishes) and while waiting to return to a boil, cut your veggies. I used what I happened to have in my fridge which was celery, and carrots, I also added a can of corn towards the end (we love corn). When the veggies begin to soften add your egg noodles (or rice) and add some shredded turkey. Once the noodles are done, so is the soup. I serve with dinner rolls, and enjoy =)