Showing posts with label kitchen. Show all posts

Saturday, September 5, 2015

Meal Plan~ Labor Day

Okay, let's try this again. Today (Saturday), we followed the meal plan. *round of applause please.  We ate tomato soup and grilled cheese for lunch (the boys also ate baby Lima beans). For dinner I make a pork loin in the oven with carrots, onions, and potatoes. It was so good I will insert a picture:


Anyways, this is Labor Day weekend so I am NOT looking forward to grocery shopping tomorrow, but it is a necessary evil. Here is my meal plan that I WILL follow!

For Breakfasts: Oatmeal, Raisin Bran (my personal fav), English muffins with egg and turkey sausage, or waffles.

Sunday:
  • Lunch: Leftovers... we have plenty!
  • Dinner: Swedish meatballs, mashed potatoes, and asparagus
 Monday: 
  • Lunch: Grill Food! Burgers and hot dogs with baked beans and mac&cheese... America! 
  • Dinner: Shepherd's Pie (with ground turkey)
Tuesday:
  • Lunch: Broccoli Mac&cheese
  • Dinner: Leftover Shepherd's pie
Wednesday: 
  • Lunch: Prorogues/ homemade pizza... quite a combo, I know.
  • Dinner: BBQ Chicken sandwiches, broccoli, and mac&cheese
Thursday:
  • Lunch: Crab legs and corn on the cob (the boys will prob not eat sandwiches #pickyeaters )
  • Dinner: Torteloni & peas
Friday:
  • Crazy day at Emmett's school and my work... we will probably grab lunch somewhere 
  • Dinner: something quick and easy like PB&J with yogurt and fruit

Monday, January 21, 2013

Operation Organization ~ Deep Freeze

 It lives in the garage and is never seen by guests... so it's okay if it's a mess, right? WRONG! I was sooo tired of spending time searching for something or accidentally re-purchasing food we already had all because my deep freeze is a hot mess... or a cold mess... whatever.


Although it is extremely utilized in our household it is always over-looked when it comes to organization. So I decided it was time to tackle this mess once and for all! I started by taking everything out and checking expiration dates. Thankfully, everything was still in date =)

I didn't want to spend any money on this project so I looked around for something I already had. I found this crate (shown below) that I purchased from Walmart for less than five dollars and was no longer using. What I think is so great about these crates is if I ever need more storage I can easily stack on another and Viola, more food space.
On the other side of the freezer is a little blue crate (pictured above) used for pop sickles =)


I used the top sliding storage bins for things I access daily, such as frozen veggies.


In the second sliding bin I put things that I keep on hand for quick lunches... easy for the husband to find!

Now for the finished product! This picture doesn't do justice for how much more functional my deep freeze has become. It took less than a half-hour and cost no money! It could use a little de-frosting, but that's for another day.


***After***


Thursday, January 3, 2013

*Thrifty Thursday*


I have an unnatural aversion to light-colored wood.... everything in my childhood home was either pine or maple. So after years of staring at a maple knife block, it was time to party.

That you'll need:
~ An ugly knife block
~ Acrylic Paint and Paint brush
~ 3D Paint
~ Pencil or Pen
~ You can either free-hand a design or print one from the computer.

First, you want to make sure the knife block is completely clean. Since its home is near the stove, I used a spray cleaner to make sure it was not only free of dust, but grease as well.


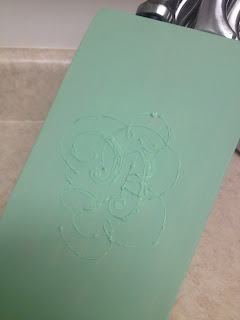
After cleaning your knife block and assembling your supplies, draw your design or use a pencil or pen to trace your design- make sure to press hard to leave an indention in the wood to help guide your paint. I used a white 3D paint.

 
I chose a "B" monogram for our last name.


After this step is it very important that you let the paint dry completely. Then, use a paint brush to paint the entire knife block the color of your choice... I chose my favorite, green =)


*The Finished Product*


"Ta-Da"!!! I absolutely love the finished product, it is subtle and adds color. A few other ideas include: adding the puffy paint last so it contrasts with your base color, using a decal instead of puffy paint, using decoupage or adding pattern. You may also chose to add a clear coat; however, it is not necessary. I hope you leave this post inspired to spice up your boring knife block =)

Saturday, October 1, 2011

Chicken Corn Cowder!!!

I made the most Yummy Chicken Corn Chowder last night and I just have to share my recipe.

1 Chicken Breast- or 2 tenders
1 Can of Chicken Broth
2 Cups of Half and Half
1 Can of Corn
1 Carrot
3 Red potatoes
Onion
Butter
Water
Pepper
Red Pepper
Celery Salt (Optional)
Onion Powder
Garlic Powder

Directions:
Cook chicken breast in chicken broth and water in a large pot covered on high heat. I used frozen chicken- and added garlic powder, onion powder, pepper, red pepper, and celery salt. Once the chicken is cooked pour all contents of the pot into a large mixing/ serving bowl.
In the same pot add around 3/4 of the stick of butter and as much onion as you desire, I used a quarter of an onion. Let that cook for a few minutes and add the potatoes, cut into small pieces, and carrot which I cut into thin slices. Next, add the corn. While the veggies are cooking shred the chicken into bite-sized pieces. After the veggies have cooked approximately 3 mins, add the contents of the mixing bowl (chicken ad broth) back into the pot, cover and cook. After 5 mins add 2 cups of half-and-half and stir well. Cover and continue cooking until the veggies are tender. I recommend serving with dinner rolls.
ENJOY!!!  =)